Add Core Data to Existing iOS Project
Easily add CoreData to an existing iOS project with Swift 5 and Xcode 10

If you have ever struggled to add Core Data to an existing iOS project, I feel your pain. Years ago when I tried to do it I failed and decided to recreated the project from scratch.
But recently I decided that I should try and add Core Data into an existing project. It turns out that it is actually quite a simple task.
There are a few things that are required when adding Core Data to an existing iOS project. The main part being that if you did not check the “Use Core Data” checkbox when you created your project, then you won’t even have the data model file, which is a bit of an issue. The other issue is that you don’t have the correct code in your AppDelegate file.
So in this tutorial I am going to show you how you can easily add these two requirements to your project so that you can use Core Data.
If you don’t want to read the article, you can always watch the video version:
Step 1: Adding the data model file
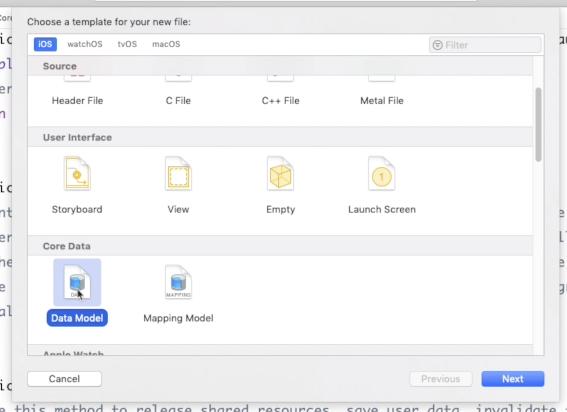
The first that you need to do is to add the data model file. To do this you will add a file to your project in the normal way.
Like this:

Now you need to select the correct file. To find the data model file you will need to scroll down a bit until you see the heading “Core Data”.
It should look something like this:

Step 2
Once you have added you data model file you need to update your AppDelegate file.
Like I mentioned previously, when you check that checkbox when starting a new iOS project, it will add all these things, and this is the code that it adds to your AppDelegate file.
The first thing you need to do is to add the following code at the top of your file by all the other imports you have.
import CoreData
Once you have done that you will be able to add the next part of the code.
lazy var persistentContainer: NSPersistentContainer = {
        /*
         The persistent container for the application. This implementation
         creates and returns a container, having loaded the store for the
         application to it. This property is optional since there are legitimate
         error conditions that could cause the creation of the store to fail.
         */
        let container = NSPersistentContainer(name: {YOU NEED TO CHANGE THIS})
        container.loadPersistentStores(completionHandler: { (storeDescription, error) in
            if let error = error as NSError? {
                // Replace this implementation with code to handle the error appropriately.
                // fatalError() causes the application to generate a crash log and terminate. You should not use this function in a shipping application, although it may be useful during development.

                /*
                 Typical reasons for an error here include:
                 * The parent directory does not exist, cannot be created, or disallows writing.
                 * The persistent store is not accessible, due to permissions or data protection when the device is locked.
                 * The device is out of space.
                 * The store could not be migrated to the current model version.
                 Check the error message to determine what the actual problem was.
                 */
                fatalError("Unresolved error \(error), \(error.userInfo)")
            }
        })
        return container
    }()

    // MARK: - Core Data Saving support

    func saveContext () {
        let context = persistentContainer.viewContext
        if context.hasChanges {
            do {
                try context.save()
            } catch {
                // Replace this implementation with code to handle the error appropriately.
                // fatalError() causes the application to generate a crash log and terminate. You should not use this function in a shipping application, although it may be useful during development.
                let nserror = error as NSError
                fatalError("Unresolved error \(nserror), \(nserror.userInfo)")
            }
        }
    }
When you add that code to your project it will not run. I have added a line of text that will not compile. You need to replace {YOU NEED TO CHANGE THIS} to be a string that is the same name as your data model file.
Something like the below:
let container = NSPersistentContainer(name: "TestModel")
Conclusion
That should be it, you should now be able to use Core Data in your project. If you want to see me test the code you can watch the video that I have included at the top of the post.
If you found this post or my video tutorial useful, please share and subscribe to my YouTube channel, it is much appreciated :)
