How to screenshot or record a video in the iOS simulator

Taking a screenshot or recording a video of the iOS simulator can sometimes be useful, whether it is for the App Store or maybe for some internal use case that the company or your team has. In this tutorial I will show you how you can take a screenshot with or without the command line, as well as showing how to record a video of the simulator using the command line.
Screenshot iOS simulator without command line
There are two ways that one can screenshot the iOS simulator without the command line.
The first and fastest way is to use the following shortcut, command + s.
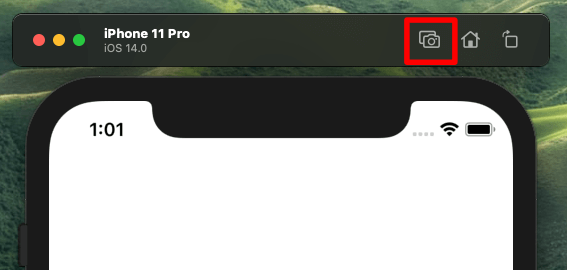
The second way is to use the button that you can find above the simulator:
Screenshot iOS simulator with the terminal(xcrun)
Taking a screenshot from the terminal is surprisingly easy, all we need to do is use xcrun.
How can we use this to take a screenshot?
TL;DR: We can use the following to take a screenshot of the currently running simulator - xcrun simctl io booted screenshot ~/Desktop/screenshot.pngAll we need is the following command: xcrun simctl io <device> <operation> <arguments>
That might look a bit confusing, so I will go through each one of the inputs/arguments.
<device>
As the name suggests this is the device that we want to use when we run an operation. To list the devices you can do the following, xcrun simctl list. This will print out a list of simulator devices, the output will look something like this:
-- iOS 14.0 --
    iPhone 8 (E3534007-01B1-4D14-BA34-EF0FD2120AD5) (Shutdown)
    iPhone 8 Plus (D3DA63EC-4F5D-4C37-B31C-EB2D563B76B4) (Shutdown)
    iPhone 11 (DB2F38F1-D672-4788-87D8-32C764F9C4E6) (Shutdown)
    iPhone 11 Pro (634B1AD4-2068-455F-9117-89BEB270ABAB) (Booted)
    iPhone 11 Pro Max (A0B631C2-F65A-47CD-9749-6FC350AEE345) (Shutdown)
As you can see, at the end of each line it will say (shutdown) or (booted). Simulators that are running will have (booted) next to their name and id.
<operation>
This is where we will specify screenshot as our operation, but, later on in this tutorial we will replace screenshot with recordVideo as the operation.
<arguments> for Screenshot
Each operation has a list of arguments, for screenshot we have the following:
--type. This will allow us to specify the image format that we want to use for the output image. The options are,png,tiff,bmp,gifandjpeg. By default, this will bepng.--display. The options for iOS areexternalorinternal, the default isinternal.tvOSandwatchOSonly allow forinternal.--mask. Themaskargument will be used for specifying whether you want to see have the device mask rendered or not. The options are,ignored,alphaorblack. The device mask will include things like the device notch and the rounded edges for example.

Let's use the above information to create the command that will take a screenshot. The most basic command that will take a screenshot is the following:
xcrun simctl io booted screenshot ~/Desktop/screenshot.png
If we want to change the image format we could use the following(generally the tool will be able to figure out the image format even without using this argument. Just make sure that you specify the the extension whether you use --type or not):
xcrun simctl io booted screenshot --type=jpeg ~/Desktop/screenshot.jpeg
If we want to add a mask we could use the following:
xcrun simctl io booted screenshot --mask=alpha ~/Desktop/screenshot.png
For all of the above commands you can replace booted with the device id that you can get from xcrun simctl list. If you have multiple simulators running, using booted will use the last booted device in the list.
And that is it! That is how simple it is to take a screenshot using the terminal. Next, we will take a look at how to record video using the terminal.
Record a video of the iOS simulator with the terminal(xcrun)
If you haven't read the previous section, I would highly suggest that you read the end the second last paragraph as I explain how to specify a specific simulator device.
TL;DR: To record the iOS simulator you can use the following command,xcrun simctl io booted recordVideo --codec=h264 ~/Desktop/video.mov. To stop recording you can usecontrol + c.
To record a video we can use the following: xcrun simctl io <device> <operation> <arguments>. This is the same as taking a screenshot, the differences come in when we choose the recordVideo operation.
Record video <arguments>
--codec. This will allow us to set thecodecthat we want to use. By default the codec will be set tohevc, but, we can set it toh264as an alternative.--display. The options for iOS areexternalorinternal, the default isinternal.tvOSandwatchOSonly allow forinternal.--mask. Themaskargument will be used for specifying whether you want to see have the device mask rendered or not. The options are,ignored,alphaorblack. The device mask will include things like the device notch and the rounded edges for example.--force. This will force the file to be written and will overwrite a file that already exists with the file path that you provided.
I am not going to go through these arguments as I did in the screenshot section of this tutorial. In the screenshot section I have showed how to use --mask. When I used --display I got an error, but looking at the explanation, I am not sure it is super useful and the default is fine.
To record a video we can use the following command:
xcrun simctl io booted recordVideo --codec=h264 ~/Desktop/video.mov
To stop the video we can do the following:
control + c
Conclusion
Taking a screenshot or a video of the simulator is really simple. The best part about this is that one can use these commands to automate this process which can save a lot of time depending how many devices you need to support.