How to Separate UITableView Datasource and Delegate
In this tutorial we will go through how you can easily separate your UITableViewDelegate and UITableViewDatasource

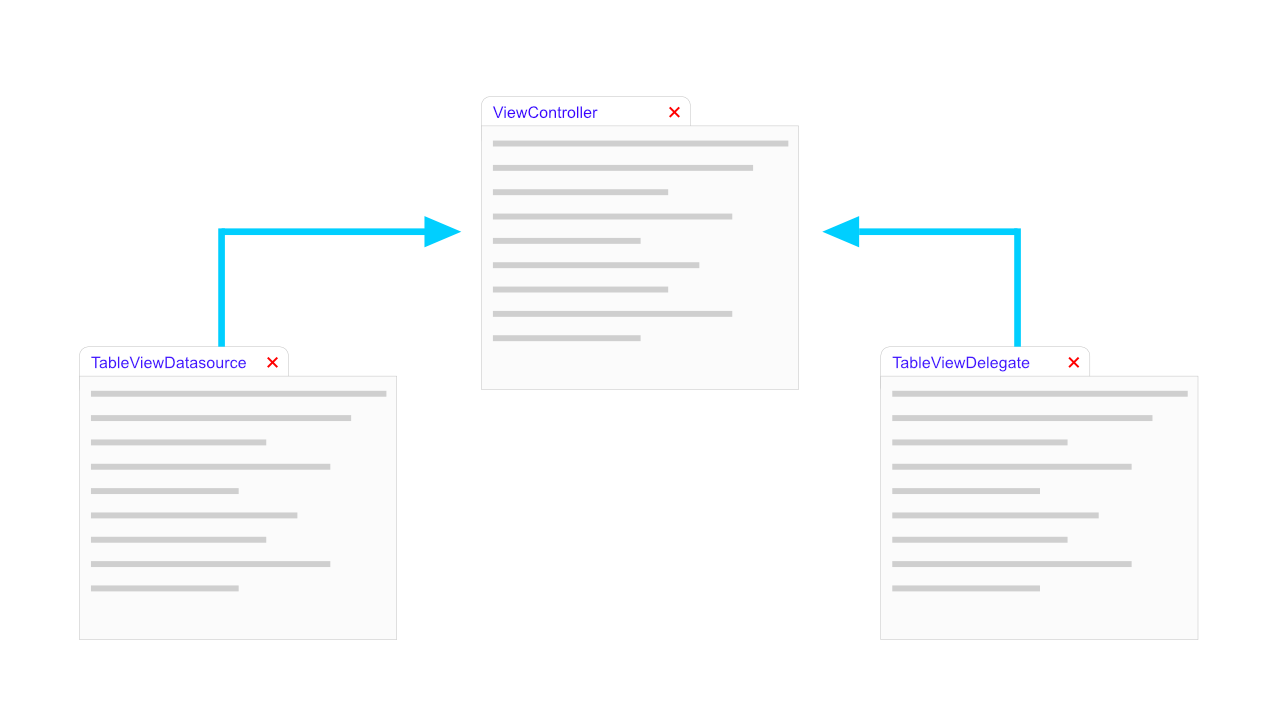
Today I will show you how to the put a UITableViewDelegate and UITableViewDatasource into different files. One of the main reasons for doing this is to get the all the code out of the view controller. This cleans up the view controller as the view controller does not need to know about the datasource and delegate methods.
You could take this further by allowing multiple UITableViews to make use of this datasource and delegate, but we will not be getting into that in this tutorial.
What is a UITableViewDatasource/Delegate?
UITableViewDatasource
The UITableViewDatasource has a few methods that help you manage data and provide the cells for your table view. The general methods that gets used from the datasource in most tutorials would include the numberOfRowsInSectionand the cellForRowAt indexPath. You are required to implement both of these methods in order to conform to the datasource protocol. There are other methods but they are optional with regards to needing to be implemented.
The numberOfRowsInSection method does exactly what it says and returns the number of rows for each section in the table view. In most tutorials only one section is used so this can be as simple as return todoListItems.count, assuming that the todoListItems is either an array or dictionary.
The cellForRowAt indexPath method provides the correct UITableViewCell for a row in the table view.
You will need to use the datasource methods to manage and display the data you want to display in the table view. To do this you need to get the correct data for the cell that you are busy setting up. The datasource is generally an array and you would use the row property that is accessible through the indexPath argument.
UITableViewDelegate
A UITableViewDelegate doesn’t really need to be implemented, but it will depend on how you want your table view to react to input from the user.
All the methods in the UITableViewDelegate protocol are optional, so you don’t need to implement any of them.
The delegate contains lifecycle methods as well was visual methods which allows you to control the height of cells and sections, but it also allows you to control what happens when a user taps on a cell. There are other methods but I won’t be going into that much detail about those in this article. But the Apple documentation sums it up quite well.
Methods for managing selections, configuring section headers and footers, deleting and reordering cells, and performing other actions in a table view.
Separating UITableViewDatasource/Delegate
When you separate the datasource and the delegateyou need to think about what these two classes are going to need.
Do they need access to the original view controller? How will the datasource access the data that it requires? These questions(there are more questions you need to ask but it really depends on the application that you are building.) will let you know what each class requires.
When I was working on this example that I use in the tutorial, those were the two questions that I asked myself. The answer was quite simple. The delegate would require a delegate property that it would be initiazed with, and the datasource would require the data to be passed through when it was being initialized.
With regards to the datasource, this could be the place where you make network calls to get your data etc. But again, based on the answer of that you would need to ask other questions.
Anyway, lets gets started on implementing these three classes. I will create the base classes first and then after that I will add the content to each of these classes.
Step 1: Setting up the ViewController.swift
This is my only viewcontroller. In this viewcontroller I have one outlet, this outlet is used for the table view.
This is what my ViewController.swift looks like.
class ViewController: UIViewController {

    @IBOutlet weak var tableView: UITableView!

    override func viewDidLoad() {
        super.viewDidLoad()
    }
}
Step 2: Create the TableViewDelegate.swift file
For this step you will need to create a new file called TableViewDelegate.swift. After creating the file you need to create a new class called TableViewDelegate and make it a subclass of NSObject as well as make it conform to UITableViewDelegate.
class TableViewDelegate: NSObject, UITableViewDelegate {
    func tableView(_ tableView: UITableView, didSelectRowAt indexPath: IndexPath) {
        // Code here
    }
}
Step 3: Create the TableViewDatasource.swift file
The first thing you need to do is to create a new file called TableViewDatasource.swift.
Once you have created the new file you need to create the new class.
class TableViewDataSource: NSObject, UITableViewDataSource {
    var data = [String]()

    init(withData data: [String]) {
        self.data = data
    }

    func tableView(_ tableView: UITableView, numberOfRowsInSection section: Int) -> Int {
        //
    }

    func tableView(_ tableView: UITableView, cellForRowAt indexPath: IndexPath) -> UITableViewCell {
        return UITableViewCell()
    }
}
The datasource as explained before has two methods that are required for you to implement. These methods will be updated later in this tutorial.
Step 4: Create the delegate protocol, ViewControllerDelegate
Before we carry on we need to create the protocol that we will use to communicate between the TableViewDelegateand the ViewController classes.
The protocol looks like this:
protocol ViewControllerDelegate: class {
    func selectedCell(row: Int)
}
The selectedCell method will allow us to tell the ViewController what cell the user has tapped.
Step 5: Update TableViewDelegate.swift
Now that we have everything setup we can start adding all the functionality to the classes we have created. We will start with the TableViewDelegate class.
Previously in this tutorial I mentioned that you need to think about what your delegate and datasource will need. For this tutorial I decided that my delegate class would need a delegate property. This delegate property would be used to tell the main view controller when a cell has been tapped.
So let’s see how the code looks. Below I show the final version of the TableViewDelegate.swift file.
class TableViewDelegate: NSObject, UITableViewDelegate {
    // #1
    weak var delegate: ViewControllerDelegate?

    // #2
    init(withDelegate delegate: ViewControllerDelegate) {
        self.delegate = delegate
    }

    // #3
    func tableView(_ tableView: UITableView, didSelectRowAt indexPath: IndexPath) {
        self.delegate?.selectedCell(row: indexPath.row)
    }
}
Now that we have the full implementation of the TableViewDelegate I can explain how it works.
The first thing that I have done is create a delegateproperty. This will allow us to notify the ViewControllerwhen the user has tapped a cell.
Next I create a custom initializer which takes the delegate as an argument and assigns it to the delegate property, so that we can use it later.
The last thing that needs to be done is to implement the didSelectRowAt indexPath method. This method is an optional method of the UITableViewDelegate protocol. All methods in the UITableViewDelegate protocol as optional. In the implementation we call the selectedCellmethod when we tap the cell. When the user taps the cell it will pass the indexPath.row as an argument to the selectedCell method. The implementation of the selectedCell method will be done in the ViewController.
Step 6: Implementing the TableViewDatasource.swift
This is the most important part of this tutorial as the TableViewDatasource controls the cells that show up in the tableview.
class TableViewDataSource: NSObject, UITableViewDataSource {
    var data = [String]()

    init(withData data: [String]) {
        self.data = data
    }

    func tableView(_ tableView: UITableView, numberOfRowsInSection section: Int) -> Int {
        return self.data.count
    }

    func tableView(_ tableView: UITableView, cellForRowAt indexPath: IndexPath) -> UITableViewCell {
        let cell = UITableViewCell()
        cell.textLabel?.text = self.data[indexPath.row]

        return cell
    }
}
In the datasource I have a data property that will hold an array of strings that will be displayed in the tableview.
The initializer takes assigns the data from its the value that gets passed in to the data property.
The next two methods control what gets shown on the tableview and what gets shown on each cell. In the numberOfRowsInSection we return the number of items that we have in our data property.
In the cellForRowAt indexPath method we create a new cell. In this method we use the indexPath.row to get the correct string from the data property and we assign that string to the cell’s textLabel text property. Once that has been set we will return the cell which in turn will show it on the tableView.
Step 7: Implementing the ViewController
All we need to do now is finish off the ViewController. In the ViewController we will create a new instance of TableViewDelegate and TableViewDatasource and assign those instances to properties on the ViewController. Once we have created these instances we will assign those instances to the delegate and datasource properties on the tableView that we have.
We will also make the ViewController conform to the ViewControllerDelegate protocol. In order to conform to this protocol we will be implementing the selectedCellmethod that will just print the indexPath.row value of the cell that the user tapped.
class ViewController: UIViewController, ViewControllerDelegate {

    var tableViewDatasource: TableViewDataSource?
    var tableViewDelegate: TableViewDelegate?

    @IBOutlet weak var tableView: UITableView!

    override func viewDidLoad() {
        super.viewDidLoad()

        self.tableViewDelegate = TableViewDelegate(withDelegate: self)
        self.tableViewDatasource = TableViewDataSource(withData: ["Item 1", "Item 2", "Item 3", "Item 4", "Item 5"])

        self.tableView.delegate = self.tableViewDelegate
        self.tableView.dataSource = self.tableViewDatasource
    }

    func selectedCell(row: Int) {
        print("Row: \(row)")
    }
}
Once you have implemented this you should be able to run the project and tap on a cell and have the indexPath.rowvalue get printed in Xcode’s console.
Conclusion
Separating the delegate and the datasource is good practice in my opinion. Separating this logic into different classes allows the ViewController to do as little as possible and stay focussed on only the things that it needs to worry about.
This can be taken further too. You could have these delegate and datasource classes do other things that relate to their function. One just has to take a look and see what each class could be doing and then decide if they should do it.