UITableViewCell swipe actions with Swift

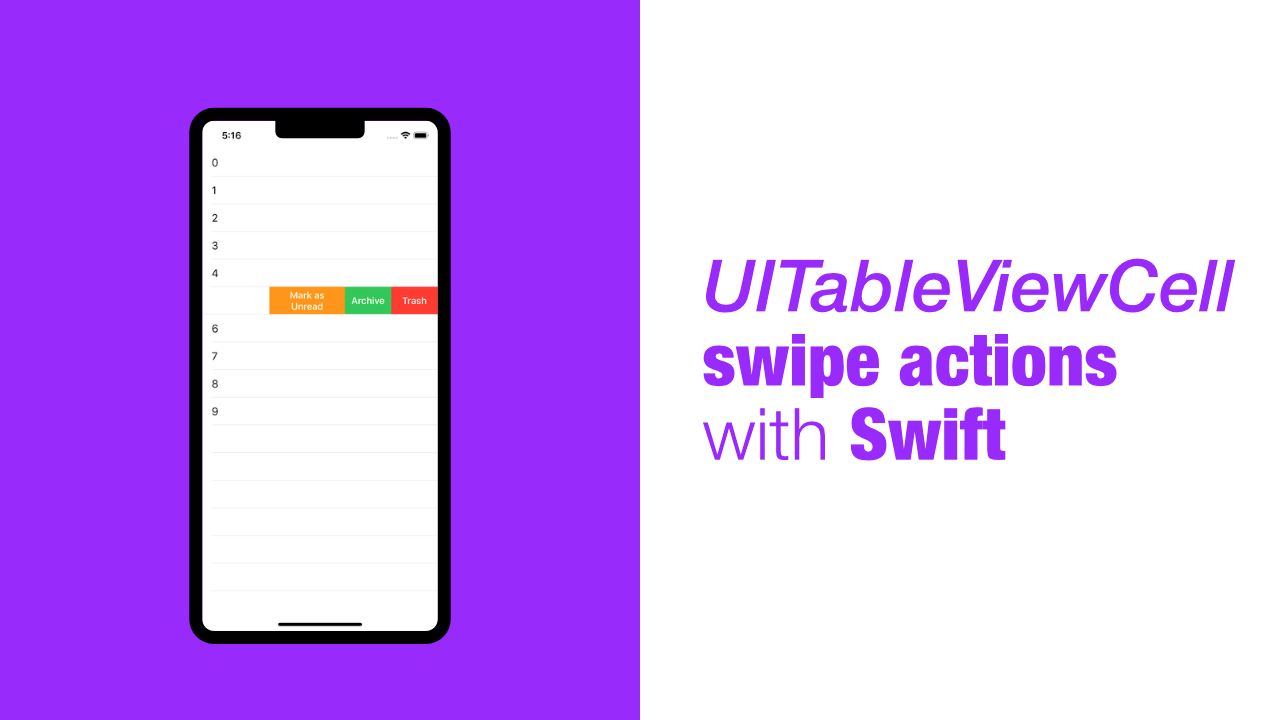
iOS 11 brought a new way to add custom swipe swipe actions to UITableViewCell's. In this tutorial we will learn how to add those swipe actions to table view cells, as well as go through some of the things to look out for when adding swipe actions.
When adding swipe actions you can add either leading swipe actions, trailing swipe actions or both kinds of swipe actions. In this tutorial we will be learning how to do both, we will also be using both actions styles, .normal as well as .destructive and we will talk about the differences between the two.
For this tutorial you will need to setup a tableview. If you don't have one setup you can take a look at this tutorial. Just note, I have not added a prototype cell to my tableview like this tutorial shows but it shouldn't make a difference. Also the outlet for my table view is called tableview where the video calls it myTableView.
One more note before we get started, I am working with a blank new project for this tutorial, so all the work in this tutorial will be done in the standard ViewController class.
Step 1: Setup tableview
Now you might be thinking that the tableview is completely setup because of the video, however, we still need to add set the delegate and datasources of the tableview.
First things first, let's create a new variables at the top of the ViewController class that will contain the data that we will show in the table view. Add the following code to the ViewController:
var data = Array(0..<10)Now that we have our data, let's set the delegate and datasource properties on our table view. Add the following code to your viewDidLoad method:
self.tableview.delegate = self
self.tableview.dataSource = self
Ok, now that we have all of this done, we need to create two extensions on the ViewController, the first will be to adopt and conform to UITableViewDataSource and the second will be to adopt and conform to the UITableViewDelegate.
Add the following code below the ViewController class:
extension ViewController: UITableViewDataSource {
    func tableView(_ tableView: UITableView, numberOfRowsInSection section: Int) -> Int {
        return self.data.count
    }

    func tableView(_ tableView: UITableView, cellForRowAt indexPath: IndexPath) -> UITableViewCell {
        let cell = UITableViewCell()
        cell.textLabel?.text = String(self.data[indexPath.row])

        return cell
    }
}
There is nothing special with the above code, these methods are normal when using a table view. Next we need to create an extension that adopts and conforms to UITableViewDelegate.
Add the following below the previous extension:
extension ViewController: UITableViewDelegate {
    // ...
}
I have left this blank for now as we will be working through this extension more carefully than the previous code we have written.
Step 2: Add handler methods
In this tutorial we will be adding the following four swipe actions, favourite, archive, unread and trash. These will be four functions that will print out some text to Xcode's console.
Add the following four functions to the UITableViewDelegate extension:
private func handleMarkAsFavourite() {
    print("Marked as favourite")
}

private func handleMarkAsUnread() {
    print("Marked as unread")
}

private func handleMoveToTrash() {
    print("Moved to trash")
}

private func handleMoveToArchive() {
    print("Moved to archive")
}
Step 3: Adding swipe actions to the table view cells
Leading swipe action
We now have all the base code written, so let's start off by adding a leading swipe action.
This is really simple as it is a delegate method of the table view. Add the following code below the handleMoveToArchive function:
func tableView(_ tableView: UITableView,
leadingSwipeActionsConfigurationForRowAt indexPath: IndexPath) -> UISwipeActionsConfiguration? {
// ...
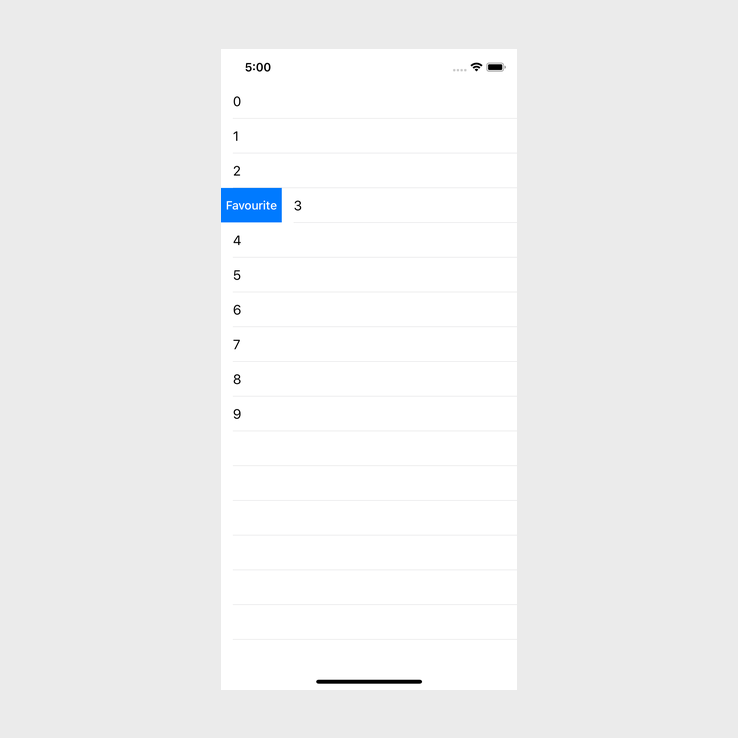
}This code will not compile as this method is expecting a return value. So, now that we have this method setup, we can add the Favourite swipe action. Add the following code inside the method we just created:
let action = UIContextualAction(style: .normal,
                                title: "Favourite") { [weak self] (action, view, completionHandler) in
                                    self?.handleMarkAsFavourite()
                                    completionHandler(true)
}
action.backgroundColor = .systemBlue
What is happening in this code? Firstly we are initialising a UIContextualAction, this is what will become our swipe action. It takes three parameters, the first being the style, in this we are using .normal, the second is the title, in this example we are setting the title to Favourite and the last parameter is a closure.
This closure handles what we want to do when someone uses this swipe action. In our case we already have handler methods, so we will be using those. As you can see in the above code we are calling self?.handleMarkAsFavourite() and then we call completionHandler(true).
The reason that we pass true to the completion handler is because our action was completed successfully. In our case this means that it printed the value to Xcode's console, but, if our handler failed then we should be calling completionHandler(false).
This is what the Apple documentation has to say about the completionHandler:
completionHandler: The handler block for you to execute after you have performed the action. This block has no return value and takes the following parameter:actionPerformed - A Boolean value indicating whether you performed the action. Specifytrueif you performed the action orfalseif you were unable to perform the action for some reason.
You can find the official documentation here.
Lastly we set the background color of our action to .systemBlue. This is self explanatory, but we will soon see this in action, but there is one more thing we need to do.
We still need to return swipe action configuration. To do this, add the following code just below where we set the background color:
return UISwipeActionsConfiguration(actions: [action])If you build and run the app now and swipe from left to right on a cell, you should see the following:
Just before we move to adding the trailing actions, there is something that we need to pay attention to with this, in iOS 13 if we swipe from right to left nothing happens, but if we are using lower than iOS 13 the delete swipe action will show up as a trailing swipe action by default. If you want to prevent this from happening you can add the following method:
func tableView(_ tableView: UITableView,
               editingStyleForRowAt indexPath: IndexPath) -> UITableViewCell.EditingStyle {
    return .none
}
Trailing swipe actions
To add the trailing swipe actions, let's first add the delegate method that we need. Add the following code below the leading swipe action delegate method:
func tableView(_ tableView: UITableView,
                   trailingSwipeActionsConfigurationForRowAt indexPath: IndexPath) -> UISwipeActionsConfiguration? {
    // ...
}
Adding actions is exactly the same as when we added the Favourite action. Add the following code inside the trailing swipe action method we just added:
// Archive action
let archive = UIContextualAction(style: .normal,
                                 title: "Archive") { [weak self] (action, view, completionHandler) in
                                    self?.handleMoveToArchive()
                                    completionHandler(true)
}
archive.backgroundColor = .systemGreen

// Trash action
let trash = UIContextualAction(style: .destructive,
                               title: "Trash") { [weak self] (action, view, completionHandler) in
                                self?.handleMoveToTrash()
                                completionHandler(true)
}
trash.backgroundColor = .systemRed

// Unread action
let unread = UIContextualAction(style: .normal,
                               title: "Mark as Unread") { [weak self] (action, view, completionHandler) in
                                self?.handleMarkAsUnread()
                                completionHandler(true)
}
unread.backgroundColor = .systemOrange

let configuration = UISwipeActionsConfiguration(actions: [trash, archive, unread])

return configuration
In the above code we have created 3 new actions and we have added those actions to the configuration, the same as when we created the Favourite swipe action.
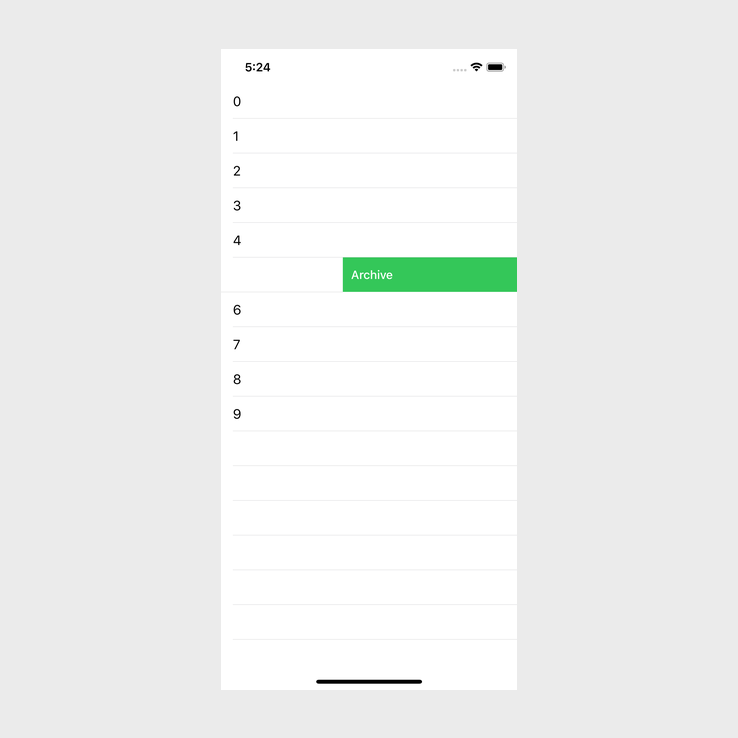
Let's build and run the app, once you have built and run it, swipe from right to left on a cell, you should see the following:
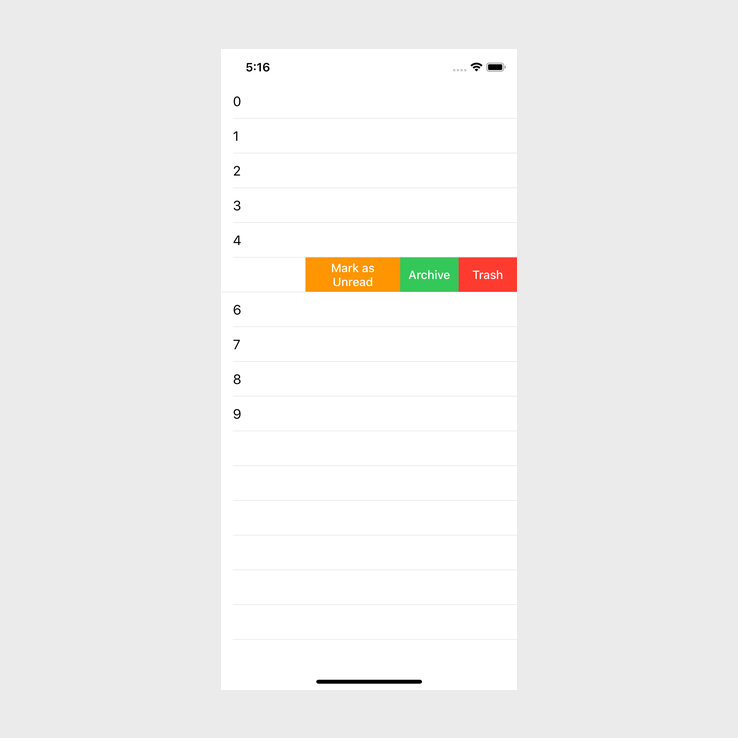
Uhm, those actions are backwards! This is the correct behaviour, the order of the actions plays an important role. The first action in our configuration, in this case Trash, gets shown at the end, this means that if we keep on dragging(full swipe) that action will be run.
This is good to know as it will allow you to put the most used action at first to allow the user to action it by just swiping further.
Now that we know that, let's talk about why the Trash action has the .destructive style. The reason for this is because the .destructive style works a bit differently visually. If the user keeps dragging and the action style is destructive, the action will drag all the way to the end and the cell will animate if we actually removed it, this is different to .normal behaviour.
If you want to test this out, you can swap the actions and see how they perform differently based on their style. I have not added any code that will update the datasource when the trash action has run, but you should still be able to see the difference in terms of the action extending the full width of the cell. Take a look at the two images below:
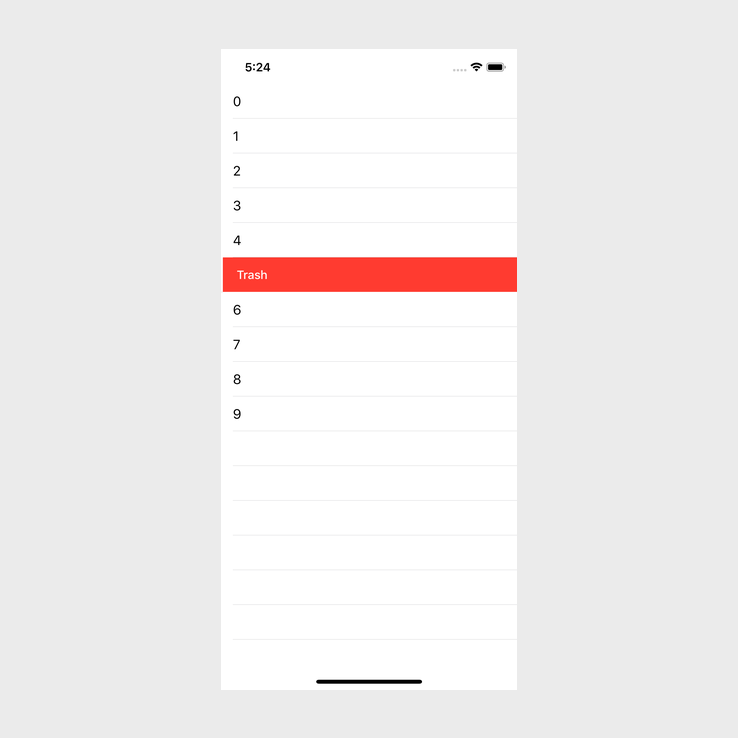
The above image shows what happens if we keep dragging from right to left on a cell that has the .destructive style.
The below image will show what happens when we keep dragging on a .normal style cell:
As you can see, the normal style only goes just past half way, where as the destructive cell goes the full length of the cell.
There is one last thing that I need to mention. If you do not want an action to run with a full swipe, you can add the following line of code just below the where we created the configuration:
configuration.performsFirstActionWithFullSwipe = falseThis will prevent the first action from running when someone does a full swipe.
Conclusion
This tutorial was a bit long for something as simple as adding these actions, but, there are quite a few things to take into account.
If you need to see the full source code, you can find it here.